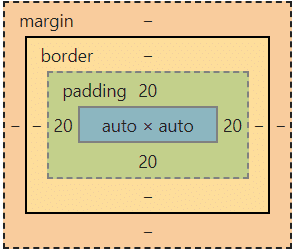
You’ve seen this picture before. The HTML element is the blue. It could be a picture, a paragraph, a heading, any HTML tag. The padding goes around it. The border goes around the padding. The margin goes on the outside of the border. The padding is inside the border. The margin is outside the border.
You can write margin just like with padding, listing measurements for all four sides or just declaring one measure for them all. Here’s a quick review.
Margin: 20px 0 means that there is 20 pixels of space on the top and bottom and none on the sides.
Margin: 20px 10px 0 5px means that the top has 20 pixels and then it moves around clockwise from there: 10 pixels on the right, none on the bottom, and 5 pixels on the left.
You can also assign a margin to any specific side like this:
margin-top: 10px;
margin-bottom: 10px;
margin-right: 10px;
margin-left: 10px;
You can also assign margin to auto. A very common use of margin looks like this. What does it tell the browser to do? What do you think happens?
margin: 0 auto;
It tells the browser that no margin is needed vertically, above or below the item on the page, and that it can put on the side margins automatically. In a lot of cases, that will result in centering the object on the page.
Certain elements take up the whole width of the page and putting in margin auto won’t do anything. Inspect elements on your page using the right click button on your mouse. You’ll see that blue box light up. If it goes across the whole page. Then there is no room for a margin to automatically appear. You can make an element smaller by defining its width. Width:300 px for instance
If something doesn’t center with margin: auto, you can also try text-align: center, even if it’s not text.
In the last lesson we learned about borders and border radius. Try out a radius of 50% to get rounded buttons.
And with borders, you can also use the same format to define border-bottom, border-top, etc. That would create a single line instead of a box.
You can watch this lesson and see it in action.